Category Archives: HRFS Tech

  • -

How to Convert a Physical Windows PC or Linux Box to a Virtual Machine (VM)

A virtual machine (VM) is an operating system OS or application environment that is installed on software which imitates dedicated hardware. The end user has the same experience on a virtual machine as they would have on dedicated hardware.

vm hrfstech hrfs tech


Want to keep an old Windows or Linux installation around without keeping the hardware around? Convert that physical Windows partition to a virtual hard drive, allowing you to boot it in a virtual machine program like VMware, Hyper-V, Parallels, or VirtualBox.

Windows ties itself to your computer’s hardware. These tools will create a copy of a physical machine’s sate and turn it into a virtual machine, allowing it to boot in the virtual machine program you prefer.

For VMware – Windows or Linux

VMware offers a free tool known as VMware vCenter Converter. It can convert both Windows and Linux physical machines into VMware virtual machines. You can then boot these virtual machines in VMware’s free VMware Player application, so this can be a completely free solution. You could also boot it up in VMware Workstation or VMware Fusion.

Download vCenter Converter from VMware and launch it on the computer you want to turn into a virtual machine. Click the “Convert machine” button on the toolbar and select the current, powered-on computer as the source. Choose a VMware Workstation, VMware Player, or VMware Fusion virtual machine as the destination and configure the options for the virtual machine.

The utility will then create a virtual machine from the current Windows system, modifying it so it will boot properly in a virtual machine program. Save that virtual machine to an external hard drive and boot it up on a different computer.

For Microsoft Hyper-V – Windows Only

Microsoft offers a Disk2vhd tool — one oftheir many useful SysInternals utilities. This utility will convert a running Windows system to a VHD (virtual hard drive) file for use in Microsoft’s virtual machine products, such asthe Hyper-V virtual machine tool included with professional versions of Windows 8 and 8.1.

Run this tool on the Windows system you want to convert. You’ll be able to select which partitions and drives you want to include in the VHD file. It’ll create a copy of the running Windows system as a VHD file, and you can take that VHD file to another computer and run it in Hyper-V — the converted physical system should boot up just fine as long as you launch it in Microsoft’s own Hyper-V virtual machine software.

For Parallels – Windows or Linux

Parallels offers their own tool known as “Parallels Transporter Agent.” This utility can be installed on either Windows or Linux, and it can convert a physical system to a virtual machine for use in the Parallels virtual machine application for Macs. It can copy the physical machine to a Parallels virtual machine file on an external drive, or you can transfer it to a Mac running Parallels over a local network.

Download the Parallels Transporter Agent application from Parallels and run it on your Windows or Linux system. Use the wizard to transfer your current physical PC to an external hard drive or your Mac over the network, choosing exactly what makes it into that virtual machine.

For VirtualBox – A Manual Method

VirtualBox doesn’t offer an easy graphical utility for converting a physical machine to a virtual machine. If you’re feeling particularly adventerous, they do offer some unsupported instructions for converting a physical Windows computer to a VirtualBox virtual machine. This requires some registry tweaking and shutting down the computer. You’ll then have to manually create a copy of the disk and convert it to a VirtualBox VDI file. The process for converting a Linux virtual machine should be about the same, but without all the extra tweaks required to make Windows behave. It’s much easier to move Linux installations between different machines with different hardware configurations.

This process isn’t for the faint of heart, and we include it here only for the sake of completeness. Even if you use VirtualBox already, you may want to just use VMware or Microsoft’s utility and give VMware or Hyper-V a try. If you’re still ready to give it a try, consult the MIgrate Windows page on VirtualBox’s wiki.


If you’re converting a Windows PC to a virtual machine, remember that you may encounter licensing issues. Windows Activation may detect that it’s running on a different machine, and you may have to contact Microsoft to get it properly activated. Windows licenses are only supposed to be in use on one computer at a time.


  • -

Remote Support

Remote Support Software:


  • TeamViewer –  is the All-In-One Software for Remote Support and Online Meetings: To Download: Click HERE


  • LogMeIn123 –  is a provider of SaaS and cloud-based remote connectivity services for collaboration, IT management: To Download: Click HERE

  • -

Site Map

Here is our Site-Map


[pagelist]


  • -

Office 365 Unified Messaging with Lync 2013 On Premise

Office 365 Unified Messaging with Lync 2013 On Premise

Lync 2013 Enterprise Voice On Premise – Exchange 2010 Sp3 Hybrid with The New Office 365 tenant (Wave 15)

First of all open up a PS shell on your Lync FE on premise then run:

  1. Set-csaccessedgeconfiguration –allowfederatedusers $true
  2. New-CsHostingProvider -Identity “Exchange Online” -Enabled $True -EnabledSharedAddressSpace $True -HostsOCSUsers $False -ProxyFqdn “exap.um.outlook.com” -IsLocal $False -VerificationLevel UseSourceVerification
  3. Get-csmanagementstorereplicationstatus ( to ensure replication has occured between all Lync servers make sure they all say true before moving on)
  4. Get-cshostingprovider -localstore to show the following
  5. Cshostingprovider
  6. Set-CsAccessEdgeConfiguration -UseDnsSrvRouting -AllowFederatedUsers 1 -EnablePartnerDiscovery 0
  7. New-CsHostedVoicemailPolicy -identity CloudUM -Destination exap.um.outlook.com -Description “Office 365 Voicemail” -Organization “tenantname.onmicrosoft.com” (Ensure you use the tenant name and NOT your on premise domain otherwise the traffic will not route and this will not work)

Log onto the O365 Wave 15 tenant

Go to Unified Messaging > UM Dial Plans > New

new um dial

Then Edit the Dial Plan > Configure

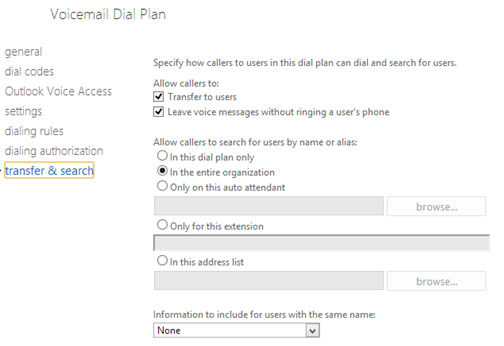
For this you should try and match the company’s on premise configuration so that it matches but below is an example:

configure

dial codes

outlook voice access

settings

dialling rules

dialling auth

transfer

Then on premise Lync 2013 you need to create the Exchange UM Contact for O365 within Lync Powershell

  • new-csexumcontact -displaynumber +44203XXXXX –sipaddress SIP:EX_UM_365_SA@yourdomain.com -registrarpool  yourpool01.youcompany.com -ou “OU=User,DC=yourcompany,dc=com”
  • Grant-cshostedvoicemailpolicy –identity “post the GUID that has been created” –policyname CloudUM

Then switch to Exchange Online Powershell

  • Set-UMmailboxpolicy -identity “Policy Name in O365” -SourceForestPolicy “CloudUM”
  • Set-UMmailboxpolicy -identity “Policy Name in O365” -SourceForestPolicy “On Premise UM Policy”

Then finally on your on premise Exchange 2010 SP3 server (Note this is only if Unified Messaging is already configured on premise so that when you migrate a UM mailbox it doesn’t fail otherwise if you don’t run this step the remote move request will fail)

  • Set-UMmailboxpolicy -identity “On Premise UM Policy” -SourceForestPolicy “Policy Name in O365”

The Very last step is to configure the user. Now if you are setting up UM brand new then carry out the following steps but if you are migrating a user then only carry this out after the user has migrated to Office 365 or you have suspended the move before completion. As otherwise UM will route to the cloud and until the mailboxes exists the voicemail message will never be delivered to the end user as you cannot have a spilt UM in cloud and mailbox on premise and vice versa.

Within Lync 2013 PowerShell

  • Grant-cshostedvoicemailpolicy –identity “accountname” –policyname CloudUM
  • Run get cs-user –identity “accountname” and check that hostedvoicemail is set to true if not run the following command.
  • Set-csuser –identity “youraccount” –hostedvoicemail $true

Finally force dirsync and then if the account in 365 doesn’t show unified messaging enable set then set it within the Exchange console in 365.


  • -

ANZ Tech Technology / TEch- HRFS Tech/ HRFS Tech Provides Laptop / Desktop Repair and Support Services, HRFS Tech Technology, PC Technology, Website Design, CCTV installation, HRFS Tech Technology Technology, Repair Laptop, Repair Desktop in Auckland, NZ Cheap computer repair, Auckland, Otahuhu desktop repair, CCTV Installations in Auckland, free laptop repair, free computer repair, Website build, cheap website design in Auckland, website design in NZ, IT Services,CCTV, Web design, web development, magento development and support specialists NZ. We design and build quality websites, but we are also online marketing experts. HRFS Tech (HRFS Tech) Technology, HRFS Tech Ltd, HRFS TEch Ltd, HRFS TEch, ANZ, PC Technology, Website Design, CCTV installation, HRFS Tech Technology Technology, Repair Laptop, Repair Desktop in Auckland, NZ Cheap computer repair, Auckland, Otahuhu desktop repair, CCTV Installations in Auckland, free laptop repair, free computer repair, Website build, cheap website design in Auckland, website design in NZ

HRFS Tech Limited has got a small dedicated team have been doing both mobile and in-house full computer repair and Design support service nationwide.

For your convenience, we travel to your place or office to fix troublesome computers and help solve your computer problems.

We have got responsive, proactive, and professionals who provide fast, friendly and efficient on-site computer repairs at your home or office.

We offers a range of services and consultation. With our in-depth knowledge and our excellent customer service skills we make sure you are treated right.

If you are not satisfied with our services you will not pay a cent. No questions asked. – Satisfaction Guarantee – Same Day Response If your job is urgent we will be on-site in a couple of hours, not days.

We provide “FREE Quote” and FREE Computer Check and, competitive price in the market.

The goal is to provide quality work making sure customers are happy with services. Please check our Recent Web Design Projects Our service is proven, guaranteed and affordable.

We offer you a no fix, no fee policy and will never charge more than a maximum of 5 hours for computer repairs to a single computer. Fast affordable computer repairs, laptop repairs and server repairs at your home ,business or our workshop.

We offers a range of services and consultation. With our in-depth knowledge and our excellent customer service skills we make sure you are treated right.

Keyword: HRFS Tech Technology / HRFS – Tech HRFS / HRFS Tech Provides Laptop / Desktop Repair and Support Services, HRFS Tech Technology, PC Technology, Website Design, CCTV installation, HRFS Tech Technology Technology, Repair Laptop, Repair Desktop in Auckland, NZ Cheap computer repair, Auckland, Otahuhu desktop repair, CCTV Installations in Auckland, free laptop repair, free computer repair, Website build, cheap website design in Auckland, website design in NZ, IT Services,CCTV, Web design, web development, magento development and support specialists NZ. We design and build quality websites, but we are also online marketing experts. HRFS Tech (HRFS Tech) Technology, HRFS Tech Ltd, HRFS TECH Ltd, HRFS , ANZ, PC Technology, Website Design, CCTV installation, HRFS Tech Technology Technology, Repair Laptop, Repair Desktop in Auckland, NZ Cheap computer repair, Auckland, Otahuhu desktop repair, CCTV Installations in Auckland, free laptop repair, free computer repair, Website build, cheap website design in Auckland, website design in NZ


  • -

How to Automatically Create Build Backups in Visual Studio

How to Automatically Create Build Backups in Visual Studio

hrfstech

If you are a one man development team, you probably don’t really have the need for a full blown version control system, yet creating source code backups for each released version is undoubtedly important.

By leveraging the power of post-build events and a simple batch script, you can easily add the ability to have Visual Studio automatically create a source code backup for each release code build.
How it works
Our solution is simple: whenever a successful build event occurs, we have a batch script run which creates a compressed archive (optionally tagged and timestamped) of all files in the respective Visual Studio project folder.

That’s it. All you have to do is follow the steps below.

Setting up automatic build backups
First you will need to download and extract the batch script file from the link at the bottom of the article. Additionally, you will need the 7-Zip command line tool (this is included with a the ‘full’ version of the Project Build Backup script, or you can download it separately). In our example, we extracted these files to the directory “C:\Tools”, but any location will work.

Open your Visual Studio Project properties, by double-clicking on My Project under the respective project.

image

In the project properties, go to the Compile section.

image

In the bottom right corner, click the Build Events button.

image

In our case, we want to make a backup after a successful compile action. Make sure you have the option to run the post-build event “On successful build” and then click the Edit Post-build button.

image

The command below creates a build backup only for the compile of the Release configuration (this is what IF condition checks for) as, realistically, we probably don’t want to make a backup of each Debug/testing build. Additionally, the current timestamp will be appended (/D switch) with the backup file being in 7z file format (/7z) as opposed to zip. By adding the /T “$(ConfigurationName)” as a parameter, we are appending the build type (Release in this case) to the name of the backup file.

IF “$(ConfigurationName)” == “Release” CALL C:\Tools\ProjectBuildBackup.bat “$(SolutionDir)” “$(ProjectDir)” “$(ProjectName)” /T “$(ConfigurationName)” /D /7z

Using the Macros button, you can have Visual Studio prefill project specific information so no hardcoding is required. You can adjust this command as needed (especially the location of the batch file), but the first three parameters will likely not need to be changed.

It is important to keep in mind that post-event operations run regardless of the project configuration selected. This is why we need to add the IF “$(ConfigurationName)” == “Release” statement – otherwise the backup action would occur on every successful build event.

image

Once you finish your command and apply it, the command string should appear in the Post-build events section.

Note that while the “CALL” command is not technically required, it is highly recommended, as if this is omitted then any events added after this may not execute.

image

Now whenever you run a compile/build with your project in the Release configuration, you will see the output from the build backup operation.

image

[…]

image

Each successful Release build creates a new timestamped archive with the solution folder in a subdirectory, “Builds” (which can be custom defined with the /O switch if needed).

image

The contents of each backup is the full Visual Studio project – source files, configuration settings, compiled binaries, and all – which makes this a true point in time backup.

image

Not a replacement for a full version control system
In closing, we just want to reiterate that this tool is not intended to replace a full blown version control system. It is simply a useful tool for developers to create snapshots of their project’s source code after each compilation.

In the event you ever have to go back and examine a prior version, having a ready-to-use (just extract to a new directory) project file for a point in time compilation can really come in handy.

Links
Download Project Build Backup Script

Download 7-Zip Command Line Tool (Note – the 7za utility is also bundled with a download from the Project Build Backup script)


  • -

All 2014 Knowledge System

Search for an Operating Instructions if you can’t find it here. 


How to Kill a Desktop Application or Background Process on Linux

Windows has Ctrl+Alt+Delete and Macs have Command+Option+Escape to force frozen applications to close. Linux has its own ways of “killing” those misbehaving processes, whether they’re graphical windows or background processes.

The exact graphical tools you can use will depend on your desktop environment, as eachdesktop environment brings different tools to the table. But most of them are pretty similar.

From a Graphical Desktop

Modern Linux desktops deal with this fairly well, and it can be surprisingly automatic. If an application isn’t responding, a desktop with a compositiong manager will often gray the entire window out to show it isn’t responding.

Read More


How to Test Your Internet Speed from the Command Line

How to Enable Automatic Security Updates on Ubuntu Server

There’s nothing more tedious as a system administrator than running security updates on a dozen servers every single day. Luckily Ubuntu will let you automate stable security updates so you’re never at risk.

All you need to do is run this one single command on your server:

sudo dpkg-reconfigure -plow unattended-upgrades

If you are logged in as root you can skip the sudo, of course.

Read More


Office file types fail to Open From Server

When you try to open or download a Microsoft Office file that is stored on a web server or a third-party web server, the associated Office application starts, but the selected file is not opened or downloaded. For example, the Office file is stored on a SharePoint server or a Web Distributed Authoring and Versioning (WebDAV) server. You get following error message:

When this problem occurs, try using HTTPS instead of HTTP to access the Office files. For example, use https://www.site.cominstead of http://www.site.com.  If you still can’t open the Office files, contact the site server administrator.

Cause

This problem occurs when the following conditions are true:

  • The server is configured for Basic authentication.

Read More


Some Useful Day-To-Day Software

Microsoft Office 2010, 2013: Download Link – Call us for “activation” – Direct Link

YouTube Downloader:  YTD Video Downloader   – Important: For installation, follow this steps Otherwise your computer might get effected by virus.

VLC Player: Download link – Direct Link

Click Here For More


Installing windows flash cards (Q&A) hrfs tech

The price for Windows 7 is the same regardless of the edition and type of license you purchaseAnswer: False

The OEM version of Windows 7 can only be installed on a new PC for resale.

Answer: True

When a partition is formatted with a file system and assigned a drive letter it is called a volume.Answer: True

Read More


Office 365 Unified Messaging with Lync 2013 On Premise

Lync 2013 Enterprise Voice On Premise – Exchange 2010 Sp3 Hybrid with The New Office 365 tenant (Wave 15)

First of all open up a PS shell on your Lync FE on premise then run:

  1. Set-csaccessedgeconfiguration –allowfederatedusers $true
  2. New-CsHostingProvider -Identity “Exchange Online” -Enabled $True -EnabledSharedAddressSpace $True -HostsOCSUsers $False -ProxyFqdn “exap.um.outlook.com” -IsLocal $False -VerificationLevel UseSourceVerification

Read More


How to “built” Active Directory in Windows Server 2012

As we all know, AD DS database stores information on user identity, computers,groups, services andresources.

AD DS domain controllers also host the service that authenticates user and computer accountswhen they log on to the domain. Because AD DS stores information about all of the objects in the domain, and all users and computers must connect to AD DS domain controllers when signing into the network, AD DS is the primary means by which you can configure and manage user and computer accounts on your network.

So today, I will guide you on how to “built” @ deploy.. and my students always name this process as a “Installation of Active Directory in Windows Server 2012“.

For this Simple Guide, I’m using Core I5-3470 3.20Ghz proc & 3.8GB RAM, all the process using Hyper-V & private network.

Let’s get started..

1 – Double confirm the Windows Server 2012 that you are using still in Workgroup configuration.

Read More


How to Rename Domain Name in Windows Server 2012 (Cluster Hyper-V and/or in-house exchange-DC?

For this exercises, I’m using MCT courseware from 20410B (Installing and Configuring Windows Server 2012).

The existing domain is ADATUM.COM and I will rename it to CPX.LOCAL.

** for those who want to built your own AD and try this exercises, please refer to my previous post 

So, let get started…

1 – Open your System Properties and check your existing domain name, if you see from my Windows Server 2012 system properties, my existing domain name isAdatum.com. This will be change to cpx.local in the short while.

Read More

Installing .NET Framework 3.5 in Windows 8 and in Windows Server 2012

Windows 8 or use this for Windows Server 2012 R2 if virtually under a Windows 8 or 8.1 Pro etc.

In Windows 8 open the Programs and Features dialog. For me the easiest way to access this dialog is via the Windows+X admin menu:

Or if windows is added to the domain or no internet access then run installation thru command line:

dism /online /enable-feature /featurename:NetFx3 /All /Source:D:\sources\sxs /LimitAccess

Read More

How to Install Windows 8.1 without a Product Key

  • Step 1: Once you’ve created a Bootable windows 8.1 USB Flash drive.  Create a Text document and copy  the following text in it.

[EditionID]
Core
[Channel]
Retail
[VL]
0

Read More


How to Build a Bootable USB Drive? or How to Install an Operating System from a USB Device?

1.  Get a USB Drive of sufficient size to contain the OS installation files you desire to install.  (If you were going to install Windows 7 this drive woul dneed to be at least 4 GB in size)

Short Version:

  1. Insert a USB flash drive into a running computer.
  2. Open a Command Prompt window as an administrator.
  3. Type diskpart.
  4. In the new command line window that opens, to determine the USB flash drive number or drive letter, at the command prompt, type list disk, and then click ENTER. The list disk command displays all the disks on the computer. Note the drive number or drive letter of the USB flash drive.

Read More


Fine Tune Star Receiver

STAR Rx can accept wide range of input signal power i.e. –20 to –60 dBm. However, the STAR Rx must be configured its “stargain” according to the signal power. Stargain controls the amplifier for the input signal. The STAR input signal can be high or low depending on the configuration of the BDC, dividers and other things.

Read More

Instructions on how to setup your email account for Microsoft Outlook. 

Click on below links to Download Instructions.

Help Outlook

HelpThunderbird 

HelpWindowsMail

How to adjust the DVB power levels in ViaSat System

ViaSat power level change was done at 8:18 PM by 1 dB and then at 8:32 PM by another 1 dB and changed back at 8:45 PM. I couldn’t see much differences once 1 dB changes was done, but at 2 dB ViaSat changes ACM gain increased 35%. For more details

Click Here

How to Change Time Zone in iDirect due to Daylight Saving

Setting the Date and Time on the NMS Servers TZ select  – For More details


  • -

How to Enable Pin Sign-in For Domain Users on Windows 8

How to Enable Pin Sign-in For Domain Users on Windows 8

Domain users are not allowed to sign in with a Pin by default. However, using a little bit of GPO, we can change that.

How to Enable Pin Sign On For Domain Users on Windows 8

Press the Win + R keyboard combination to open a run box then type “gpedit.msc” and press enter.

image

When the Group Policy editor opens, navigate to:

Computer Configuration\Administrative Templates\System\Logon

image

On the right hand side, double click on the “Turn on PIN sign-in” setting.

image

Now switch the radio button from Not Configured to Enabled, then click Apply.

image

Once the setting has been activated, you need to refresh your current Group Policy settings. To do that, open a run box using the Win + R keyboard combo and type the following, then press enter.

gpupdate /force

image

Of course, this will only be useful in a domain environment, in which case you could assign this group policy setting to an OU in Active Directory. That’s all there is to it.


  • -

How to Kill a Desktop Application or Background Process on Linux

How to Kill a Desktop Application or Background Process on Linux

Windows has Ctrl+Alt+Delete and Macs have Command+Option+Escape to force frozen applications to close. Linux has its own ways of “killing” those misbehaving processes, whether they’re graphical windows or background processes.

The exact graphical tools you can use will depend on your desktop environment, as each desktop environment brings different tools to the table. But most of them are pretty similar.

From a Graphical Desktop

Modern Linux desktops deal with this fairly well, and it can be surprisingly automatic. If an application isn’t responding, a desktop with a composition manager will often gray the entire window out to show it isn’t responding.

Click the X button on the window’s titlebar and the window manager will often inform you that the window isn’t responding. You can either give it some time to respond or click an option like “Force Quit” to foricbly close the application.

On Linux, the window manager that paints the title bars is separate from the application itself, so it usually responds even if the window won’t. Some windows do paint their own interfaces, though, so this may not always work.

The “xkill” application can help you quickly kill any graphical window on your desktop.

Depending on your desktop environment and its configuration, you may be able to activate this shortcut by pressing Ctrl+Alt+Esc. You could also just run the xkill command — you could open a Terminal window, type xkill without the quotes, and press Enter. Or, you could press a shortcut like Alt+F2, which opens the “Run Command” dialog on Ubuntu’s Unity desktop and many others. Type xkill into the dialog and press Enter.

Your cursor will change to an X. Click a window and the xkill utility will determine what process is associated with that window, and then immediately kill that process. The window will instantly vanish and close.

Your Linux desktop probably has a tool that works similarly to the Task Manager on Windows, too. On Ubuntu’s Unity desktop, GNOME, and other GNOME-based desktops, this is the System Monitor utility. Open the System Monitor utility to see a list of running proesses — including background ones. You can also forcibly kill processes from here if they’re misbehaving.


From the Terminal

Let’s say you want to do this all from the terminal instead. We covered a lot of the utilities you can use for this when we looked at commands for managing processes on Linux.

Let’s say Firefox is running in the background and we want to kill it from the terminal. The standard kill command takes a process ID number, so you’ll need to find it first.

For example, you could run a command like:

ps aux | grep firefox

Which would list all processes and pipe that list to the grep command, which will filter it and print only lines containing Firefox. (The second line you’ll see is the grep process itself.) You can also get the process ID from the top command and many other places.

Take the process ID number from the Firefox process — just to the right of the username — and provide it to the kill command. That is, run the command like so:

kill ####

If the process is running as another user, you’ll need to become the root user first — or at least run the kill command with the sudo command, like so:

sudo kill ####

That’s a basic method, but it isn’t quite the fastest. The pgrep and pkill commands help streamline this. For example, run “pgrep firefox” to see the process ID of the running Firefox process. You could then feed that number to the kill command.

Or, skip all that and run “pkill firefox” to kill the Firefox process without knowing its number. pkill performs some basic pattern-matching — it’ll try to find processes with names containing firefox.

The killall command is like pkill, but a bit more precise. It’ll kill all running processes with a specific name. So running “killall firefox” will kill all running processes named “firefox,” but not any processes that just have firefox in their names.


These are far from the only commands included on Linux for managing processes. If you’re using some type of server administration software, it may also have helpful ways to kill and restart processes.

System services work different from processes — you’ll need to use specific commands to bring down, restart, or bring up services. Those specific commands can be different on different Linux distributions.


  • -

How to Enable Automatic Security Updates on Ubuntu Server

How to Enable Automatic Security Updates on Ubuntu Server

There’s nothing more tedious as a system administrator than running security updates on a dozen servers every single day. Luckily Ubuntu will let you automate stable security updates so you’re never at risk.

All you need to do is run this one single command on your server:

sudo dpkg-reconfigure -plow unattended-upgrades

If you are logged in as root you can skip the sudo, of course.

Once you run the command you’ll be presented with a very pink screen that might prompt you to say Ok.

If your terminal was a little wider you probably would see it all on a single page, but either way you’ll be asked if you want to automatically download and install stable updates. Select Yes.

The utility will write out the necessary configuration files, and security updates should become automated. Note that by default it’s going to wait to check once a day, so it’s not like any pending security updates will be instantly installed once you change this setting, but you shouldn’t have to install security updates ever again.