Category Archives: HRFS Tech

  • -

TCPView – To View all running TCP traffic

TCPView is a Windows program that will show you detailed listings of all TCP and UDP endpoints on your system, including the local and remote addresses and state of TCP connections. On Windows Server 2008, Vista, and XP, TCPView also reports the name of the process that owns the endpoint. TCPView provides a more informative and conveniently presented subset of the Netstat program that ships with Windows. The TCPView download includes Tcpvcon, a command-line version with the same functionality.

 When do you need this: READ THIS WHY

Download it HERE  – External Link – safe Microsoft website

Or if they have removed or moved it:

Then Click here to download it from our Server – Click TCPView -hrfstech

Introduction

TCPView is a Windows program that will show you detailed listings of all TCP and UDP endpoints on your system, including the local and remote addresses and state of TCP connections. On Windows Server 2008, Vista, and XP, TCPView also reports the name of the process that owns the endpoint. TCPView provides a more informative and conveniently presented subset of the Netstat program that ships with Windows. The TCPView download includes Tcpvcon, a command-line version with the same functionality.

Using TCPView

When you start TCPView it will enumerate all active TCP and UDP endpoints, resolving all IP addresses to their domain name versions. You can use a toolbar button or menu item to toggle the display of resolved names. On Windows XP systems, TCPView shows the name of the process that owns each endpoint.

By default, TCPView updates every second, but you can use theOptions|Refresh Rate menu item to change the rate. Endpoints that change state from one update to the next are highlighted in yellow; those that are deleted are shown in red, and new endpoints are shown in green.

You can close established TCP/IP connections (those labeled with a state of ESTABLISHED) by selecting File|Close Connections, or by right-clicking on a connection and choosing Close Connections from the resulting context menu.

You can save TCPView’s output window to a file using the Save menu item.

Using Tcpvcon

Tcpvcon usage is similar to that of the built-in Windows netstat utility:

Usage: tcpvcon [-a] [-c] [-n] [process name or PID]

-a Show all endpoints (default is to show established TCP connections).
-c Print output as CSV.
-n Don’t resolve addresses..

  • -

How to Detect Computer & Email Monitoring or Spying Software at your work or home PC

As an IT Pro, I routinely monitor employees computers and emails only if require investigations. It’s essential in a work environment for administrative purposes as well as for security. Monitoring email, for example, allows you to block attachments that could contain a virus or spyware. The only time I have to connect to a users computer and do work directly on their computer is to fix a problem.

However, if you feel that you are being monitored when you shouldn’t be, there are a few little tricks you can use to determine if you’re right. First off, to monitor someones computer means that they can watch everything that you are doing on your computer in real time. Blocking porn sites, removing attachments or blocking spam before it gets to your inbox, etc is not really monitoring, but more like filtering.

hrfs tech it poeple watching

The one BIG problem I want to emphasize before moving on is that if you are in a corporate environment and think  you’re being monitored, you should assume they can see EVERYTHING you do on the computer. Also, assume that you won’t be able to actually find the software that is recording everything. In corporate environments, the computers are so customized and reconfigured that it’s nearly impossible to detect anything unless you’re a hacker. This article is more geared towards home users who thinks a friend or family member is trying to monitor them.

Computer Monitoring

So now, if you still think someone is spying on you, here’s what you can do! The easiest and simplest way someone can log into your computer is by using remote desktop. The good thing is that Windows does not support multiple concurrent connections while someone is logged into the console (there is a hack for this, but I would not worry about). What this means is that if you’re logged into your XP, 7 or Windows 8 computer and someone were to connect to it using the BUILT-IN REMOTE DESKTOP feature of Windows, your screen would become locked and it would tell tell you who is connected.

So why is that useful? It’s useful because it means that in order for someone to connect to YOUR session without you noticing or your screen being taken over, they have use third-party software. However, in 2014, no one is going to be that obvious and it’s a lot harder to detect third-party software stealth software.

If we’re looking for third-party software, which is usually referred to as remote control software or virtual network computing (VNC) software, we have to start from scratch. Usually, when someone installs this type of software on your computer, they have to do it while you’re not there and they have to restart your computer. So the first thing that could clue you off is if your computer has been restarted and you don’t remember doing it.

Secondly, you should check in your Start Menu – All Programs and to see whether or not something like VNC, RealVNC, TightVNC, UltraVNC, LogMeIn, GoToMyPC, etc is installed. A lot of times people are sloppy and figure that a normal user won’t know what a piece of software is and will simply ignore it. If any of those programs are installed, then someone can connect to your computer without you knowing it as long as the program is running in the background as a Windows service.

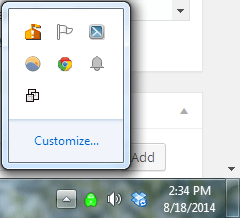
That brings us to the third point. Usually, if one of the above listed programs are installed, there will be an icon for it in the task bar because it needs to be constantly running to work.
taskbar icons

Check all of your icons (even the hidden ones) and see what is running. If you find something you’ve not heard of, do a quick Google search to see what pops up. It’s pretty easy for monitoring software to hide the taskbar icon, so if you don’t see anything unusual there, it doesn’t mean you don’t have monitoring software installed.

So if nothing is showing up in the obvious places, let’s move on to the more complicated stuff.

Check Firewall Ports

Again, because these are third-party apps, they have to connect to Windows on different communication ports. Ports are simply a virtual data connection by which computers share information directly. As you may already know, Windows comes with a built-in firewall that blocks many of the incoming ports for security reasons. If you’re not running an FTP site, why should your port 23 be open, right?

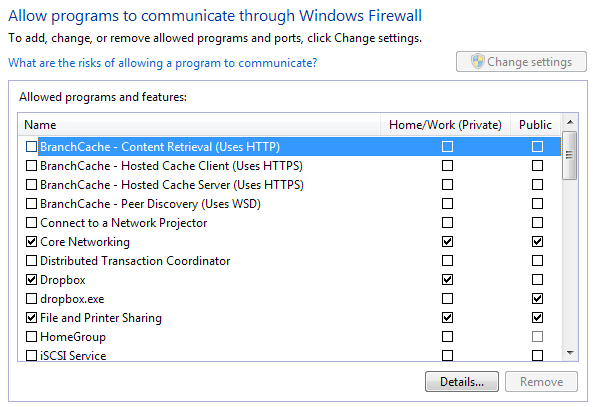
So in order for these third-party apps to connect to your computer, they must come through a port, which has to be open on your computer. You can check all the open ports by going to Start, Control Panel, andWindows Firewall. Then click on Allow a program of feature through Windows Firewall on the left hand side.
allow programs firewall

Here you’ll see see a list of programs with check boxes next to them. The ones that are checked are “open” and the unchecked or unlisted ones are “closed”. Go through the list and see if there is a program you’re not familiar with or that matches VNC, remote control, etc. If so, you can block the program by un-checking the box for it!

Check Outbound Connections

Unfortunately, it’s a bit more complicated than this. In some instances, there may be an incoming connection, but in many cases, the software installed on your computer will only have an outbound connection to a server. In Windows, all outbounds connections are allowed, which means nothing is blocked. If all the spying software does is record data and send it to a server, then it only uses an outbound connection and therefore won’t show up in that firewall list.

In order to catch a program like that, we have to see outbound connections from our computer to servers. There are a whole host of ways we can do this and I’m going to talk about one or two here. Like I said earlier, it gets a bit complicated now because we’re dealing with really stealthy software and you’re not going to find it easily.

TCPView

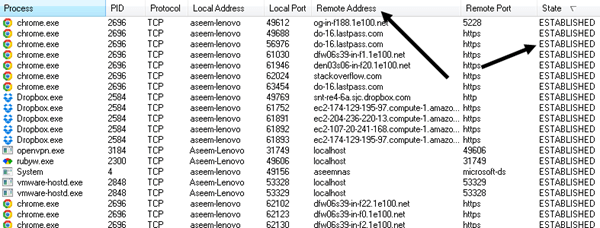
Firstly, download a program called TCPView from Microsoft or ANZ Tech Website. It’s a very small file and you don’t even have to install it, just unzip it and double-click on Tcpview. The main window will look like this and probably make no sense.
tcpview

Basically, it’s showing you all the connections from your computer to other computers. On the left side is the process name, which will be the programs running, i.e. Chrome, Dropbox, etc. The only other columns we need to look at are Remote Address and State. Go ahead and sort by State column and look at all of them processes listed under ESTABLISHED. Established means there is currently an open connection. Note that the spying software may not always be connected to the remote server, so it’s a good idea to leave this program open and monitor for any new processes that may show up under the established state.

What you want to do is filter out that list to processes whose name you don’t recognize. Chrome and Dropbox are fine and no cause for alarm, but what’s openvpn.exe and rubyw.exe? Well, in my case, I use a VPN to connect to the Internet so those process are for my VPN service. However, you can just Google those services and quickly figure that out yourself. VPN software is not spying software, so no worries there. When you search for a process, you’ll instantly be able to tell whether or not it’s safe by just looking at the search results.

Another thing you want to check are the far right columns called Sent Packets, Sent Bytes, etc. Sort by Sent Bytes and you can instantly see which process is sending the most data from your computer. If someone is monitoring your computer, they have to be sending the data somwhere, so unless the process is hidden extremely well, you should see it here.

sent data

Process Explorer

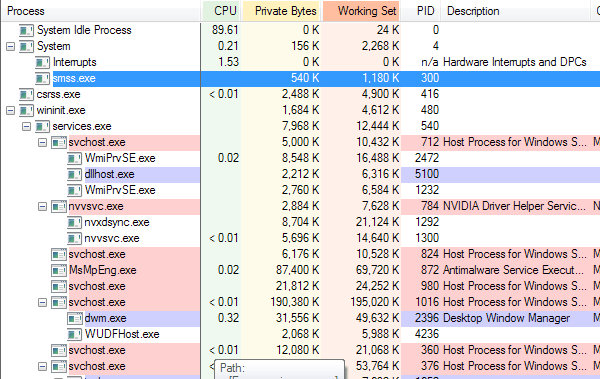
Another program you can use to find all the processes running on your computer is Process Explorer from Microsoft. When you run it, you’ll see a whole lot of information about every single process and even child processes running inside parent processes.
process explorer

Process Explorer is pretty awesome because it connects up with VirusTotal and can tell you instantly if a process has been detected as malware or not. To do that, click on Options, VirusTotal.com and then click on Check VirusTotal.com. It’ll bring you to their website to read the TOS, just close that out and click Yeson the dialog in the program.

check virustotal

Once you do that, you’ll see a new column that shows the last scan detection rate for a lot of the processes. It won’t be able to get the value for all processes, but it’s better than nothing. For the ones that don’t have a score, go ahead and manually search for those processes in Google. For the ones with scores, you want it to pretty much say 0/XX. If it’s not 0, go ahead and Google the process or click on the numbers to be taken to the VirusTotal website for that process.
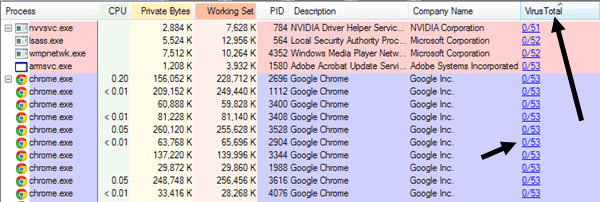
virustotal scan

I also tend to sort the list by Company Name and any process that doesn’t have a company listed, I Google to check. However, even with these programs you still may not see all the processes.

Rootkits

There are also a class stealth programs called rootkits, which the two programs above won’t even be able to see. In this case, if you found nothing suspicious when checking all the processes above, you’ll need to try even more robust tools. Another good tool from Microsoft is Rootkit Revealer, however it’s very old.

Other good anti-rootkit tools are Malwarebytes Anti-Rootkit Beta, which I would highly recommend since their anti-malware tool was ranked #1 in 2014. Another popular one is GMER.
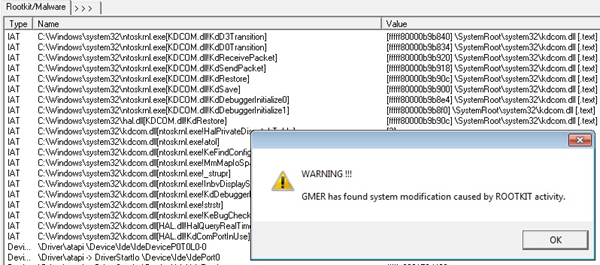
gmer

I suggest you install these tools and run them. If they find anything, remove or delete whatever they suggest. In addition, you should instal anti-malware and anti-virus software. A lot of these stealth programs that people use are considered malware/viruses, so they will get removed if you run the appropriate software. If something gets detected, make sure to Google it so you can find out whether it was monitoring software or not.

Email & Web Site Monitoring

To check whether your email is being monitored is also complicated, but we’ll stick with the easy stuff for this article. Whenever you send an email from Outlook or some email client on your computer, it always has to connect to an email server. Now it can either connect directly or it can connect through what is called a proxy server, which takes a request, alters or checks it, and forwards it on to another server.

If you’re going through a proxy server for email or web browsing, than the web sites you access or the emails you write can be saved and viewed later on. You can check for both and here’s how. For IE, go toTools, then Internet Options. Click on the Connections tab and choose LAN Settings.
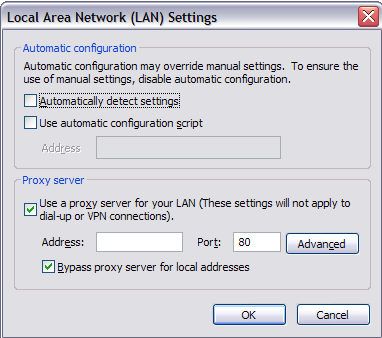
If the Proxy Server box is checked and it has a local IP address with a port number, then that means you’re going through a local server first before it reaches the web server. This means that any web site you visit first goes through another server running some kind of software that either blocks the address or simply logs it. The only time you would be somewhat safe is if the site you are visiting is using SSL (HTTPS in the address bar), which means everything sent from your computer to the remote server is encrypted. Even if your company were to capture the data in-between, it would be encrypted. I say somewhat safe because if there is spying software installed on your computer, it can capture keystrokes and therefore capture whatever you type into those secure sites.

For your corporate email, you’re checking for the same thing, a local IP address for the POP and SMTP mail servers. To check in Outlook, go to Tools, Email Accounts, and click Change or Properties, and find the values for POP and SMTP server. Unfortunately, in corporate environments, the email server is probably local and therefore you are most definitely being monitored, even if it’s not through a proxy.

You should always be careful in writing emails or browsing web sites while at the office. Trying to break through the security also might get you in trouble if they find out you bypassed their systems! IT people don’t like that, I can tell you from experience! However, it you want to secure your web browsing and email activity, your best bet is to use VPN like Private Internet Access.

This requires installing software on the computer, which you may not be able to do in the first place. However if you can, you can be pretty sure no one is able to view what you’re doing in your browser as long as their is no local spying software installed! There is nothing that can hide your activities from locally installed spying software because it can record keystrokes, etc, so try your best to follow my instructions above and disable the monitoring program. If you have any questions or concerns, feel free to comment. Enjoy!


  • -

2014 Best Anti-Virus Recommended by Microsoft

Malwarebytes Anti-Rootkit Beta, which I would highly recommend since their anti-malware tool was ranked #1 in 2014 after another popular one is GMER.

To download, click HERE to download it directly from MalwareBytes Website.


Do NOT download it elsewhere unless you are sure, that’s the right software.

Not Free but you can try it for 14 days and so that will really clean if any existing viruses or Malwares etc.


ANZ Tech Enterprise Limited

ANZ Tech

ANZTech

hrfstech


  • -

Sharepoint – How to turn off Excel opening documents in the browser -azntech

  1. Go to the Site Collection Settings Page
  2. Activate the feature Open Documents in Client Applications by Default”

hrfs tech site setting


hrfs tech

 Click on Activate


  • -

How to Install Windows 8.1 without a Product Key – ANZTech (hrfstech)

For those who want to skip the product key while installing windows 8 or windows 8.1, the following instructions will guide you through the entire process.

Note: Skipping the product key doesn’t means you get a fully activated windows installation. Once you skip the product key, your windows installation will be limited to a 30 days trial period and you will have to purchase a genuine windows 8.1 product keyin order to activate your windows 8.1 installation.

How to Install Windows 8.1 without a Product Key

  • Step 1: Follow the following guide to download a official copy of Windows 8.1 directly from Microsoft’s servers.

How to Download Official Windows 8.1 ISO images from Microsoft.

  • Step 2: Once you’ve downloaded the Windows 8.1 ISO images, follow the guide below to create a Bootable Windows 8.1 USB Flash drive.

How to Create a Bootable Windows 8.1 USB Flash drive.

  • Step 3: Once you’ve created a Bootable windows 8.1 USB Flash drive.  Create a Text document and copy  the following text in it.

[EditionID]
Core
[Channel]
Retail
[VL]
0

  • Step 4: Save the text document in the Sources folder of the Bootable Windows 8.1 USB Flash Drive with the file name as ei.cfg and select Save as type as ALL Files.

skip-windows-8.1-product-key

That’s it. Now go ahead and boot from the Bootable windows 8.1 USB Flash drive. This time you will see a skip button when you are prompted to enter a product key.

Windows-8-Skip-Product-Key

Once you have successfully installed Windows 8.1 through this method, you will then have 30 days to activate your windows 8.1 installation.


hile skipping a product key during the installation is nice, it won’t get you too far as it used to be. You will need your windows 8 activated before customizing your Windows, i.e. PC Settings.

Go to System window (type “system” in start screen), you will notice the message indicating that Windows is not activated at near the bottom of the window.

Windows 8 is not activated

To activate, you can click the link “View details in Windows Activation”.

Windows 8 Activation Window

Note that the error code under Activation details section indicates that you don’t have a valid product key to activate your Windows 8 at the moment.

Click on Activate with a new key button, and that’s where you will see the following screen we mentioned in our early post how to change product key and activate windows 8.

Windows 8 Activate Window

Source: Microsoft 


  • -

ICT Consultation and Support

The ANZ Tech ‘no loose ends’ support plan provides you the expertise of a New Zealand based IT department for an affordable monthly fee. We have comprehensive support plans (24 hours a day/ 7 days a week) to give you confidence and peace of mind.

  • Proactive
  • Responsive
  • Experienced
  • Accountable
  • Established


ANZTech pride ourselves on exceptional service delivery with an expert team who is responsive to your service needs. Those services include:

  • Helpdesk
  • Engineering Services
  • Project Management
  • Account Management
  • Quotedesk


Many clients based in New Zealand are considering a shift from traditional client/server to the cloud. ANZTech offers reliable, flexible cloud service without significant IT capital investment. Give us an opportunity to discuss the benefits of cloud and how it could help your business. Cloud based consulting and services include:

  • Office 365
  • Online Backup
  • DataCentre Colocation
  • Cloud Servers


In addition to our ‘no loose ends’ support plan, ANZTech offers a range of managed services to meet your IT needs. Our services include:

  • Anti-virus/Anti-spyware
  • Power Protection
  • Backup Systems
  • SPAM Protection
  • Firewall Security
  • Disaster Recovery

  • -

How to Use LVM on Ubuntu for Easy Partition Resizing and Snapshots (screenshot)

Ubuntu’s installer offers an easy “Use LVM” checkbox. The description says it enables Logical Volume Management so you can take snapshots and more easily resize your hard disk partitions — here’s how to do that.

LVM is a technology that’s similar to RAID arrays or Storage Spaces on Windows in some ways. While this technology is particularly useful on servers, it can be used on desktop PCs, too.
Should You Use LVM With Your New Ubuntu Installation?
The first question is whether you even want to use LVM with your Ubuntu installation. Ubuntu makes this easy to enable with a quick click, but this option isn’t enabled by default. As the installer says, this allows you to resize partitions, create snapshots, merge multiple disks into a single logical volume, and so on — all while the system is running. Unlike with typical partitions, you don’t have to shut down your system, boot from a live CD or USB drive, and resize your partitions while they aren’t in use.

To be perfectly honest, the average Ubuntu desktop user probably won’t realize whether they’re using LVM or not. But, if you want to do more advanced things later, LVM can help. LVM is potentially more complex, which could cause problems if you need to recover your data later — especially if you’re not that experienced with it. There shouldn’t be a noticeable performance penalty here — LVM is implemented right down in the Linux kernel.


We’re previously explained what LVM is. In a nutshell, it provides a layer of abstraction between your physical disks and the partitions presented to your operating system. For example, your computer might have two hard drives inside it, each 1 TB in size. You’d have to have at least two partitions on these disks, and each of these partitions would be 1 TB in size.

LVM provides a layer of abstraction over this. Instead of the traditional partition on a disk, LVM would treat the disks as two separate “physical volumes” after you initialize them. You could then create “logical volumes” based on these physical volumes. For example, you could combine those two 1 TB disks into a single 2 TB partition. Your operating system would just see a 2 TB volume, and LVM would deal with everything in the background. A group of physical volumes and logical volumes is known as a “volume group.” A typical system will just have a single volume group.

This layer of abstraction makes it possibly to easily resize partitions, combine multiple disks into a single volume, and even take “snapshots” of a partition’s file system while it’s running, all without unmounting it.

Note that merging multiple disks into a single volume can be a bad idea if you’re not creating backups. It’s like with RAID 0 — if you combine two 1 TB volumes into a single 2 TB volume, you could lose important data on the volume if just one of your hard disks fails. Backups are crucial if you go this route.

Traditionally, LVM volumes are managed with Linux terminal commands.These will work for you on Ubuntu, but there’s an easier, graphical method anyone can take advantage of. If you’re a Linux user used to using GParted or a similar partition manager, don’t bother — GParted doesn’t have support for LVM disks.

Instead, you can use the Disks utility included along with Ubuntu for this. This utility is also known as GNOME Disk Utility, or Palimpsest. Launch it by clicking the icon on the dash, searching for Disks, and pressing Enter. Unlike GParted, the Disks utility will display your LVM partitions under “Other Devices,” so you can format them and adjust other options if you need to. This utility will also work from a live CD or USB drive, too.

Unfortunately, the Disks utility doesn’t include support for taking advantage of LVM’s most powerful features. There’s no options for managing your volume groups, extending partitions, or taking snapshots. You could do that from the terminal, but you don’t have to. Instead, you can open the Ubuntu Software Center, search for LVM, and install the Logical Volume Management tool. You could also just run the sudo apt-get install system-config-lvm command in a terminal window. After it’s installed, you can open the Logical Volume Management utility from the dash.

This graphical configuration tool was made by Red Hat. It’s a bit dated, but it’s the only graphical way to do this stuff without resorting to terminal commands.

Let’s say you wanted to add a new physical volume to your volume group. You’d open the tool, select the new disk under Uninitialized Entries, and click the “Initialize Entry” button. You’d then find the new physical volume under Unallocated Volumes, and you could use the “Add to existing Volume Group” button to add it to the “ubuntu-vg” volume group Ubuntu created during the installation process.

The volume group view shows you a visual overview of your physical volumes and logical volumes. Here, we have two physical partitions across two separate hard drives. We have a swap partition and a root partition, just as Ubuntu sets up its partitioning scheme by default. Because we’ve added a second physical partition from another drive, there’s now a good chunk of unused space.

To expand a logical partition into the physical space, you could select it under Logical View, click Edit Properties, and modify the size to grow the partition. You could also shrink it from here.

The other options in system-config-lvm allow you to set up snapshots and mirroring. You probably won’t need these features on a typical desktop, but they’re available graphically here. Remember, you can also do all of this with terminal commands.


  • -

How to Convert a Physical Windows PC or Linux Box to a Virtual Machine (VM)

A virtual machine (VM) is an operating system OS or application environment that is installed on software which imitates dedicated hardware. The end user has the same experience on a virtual machine as they would have on dedicated hardware.

vm hrfstech hrfs tech


Want to keep an old Windows or Linux installation around without keeping the hardware around? Convert that physical Windows partition to a virtual hard drive, allowing you to boot it in a virtual machine program like VMware, Hyper-V, Parallels, or VirtualBox.

Windows ties itself to your computer’s hardware. These tools will create a copy of a physical machine’s sate and turn it into a virtual machine, allowing it to boot in the virtual machine program you prefer.

For VMware – Windows or Linux

VMware offers a free tool known as VMware vCenter Converter. It can convert both Windows and Linux physical machines into VMware virtual machines. You can then boot these virtual machines in VMware’s free VMware Player application, so this can be a completely free solution. You could also boot it up in VMware Workstation or VMware Fusion.

Download vCenter Converter from VMware and launch it on the computer you want to turn into a virtual machine. Click the “Convert machine” button on the toolbar and select the current, powered-on computer as the source. Choose a VMware Workstation, VMware Player, or VMware Fusion virtual machine as the destination and configure the options for the virtual machine.

The utility will then create a virtual machine from the current Windows system, modifying it so it will boot properly in a virtual machine program. Save that virtual machine to an external hard drive and boot it up on a different computer.

For Microsoft Hyper-V – Windows Only

Microsoft offers a Disk2vhd tool — one oftheir many useful SysInternals utilities. This utility will convert a running Windows system to a VHD (virtual hard drive) file for use in Microsoft’s virtual machine products, such asthe Hyper-V virtual machine tool included with professional versions of Windows 8 and 8.1.

Run this tool on the Windows system you want to convert. You’ll be able to select which partitions and drives you want to include in the VHD file. It’ll create a copy of the running Windows system as a VHD file, and you can take that VHD file to another computer and run it in Hyper-V — the converted physical system should boot up just fine as long as you launch it in Microsoft’s own Hyper-V virtual machine software.

For Parallels – Windows or Linux

Parallels offers their own tool known as “Parallels Transporter Agent.” This utility can be installed on either Windows or Linux, and it can convert a physical system to a virtual machine for use in the Parallels virtual machine application for Macs. It can copy the physical machine to a Parallels virtual machine file on an external drive, or you can transfer it to a Mac running Parallels over a local network.

Download the Parallels Transporter Agent application from Parallels and run it on your Windows or Linux system. Use the wizard to transfer your current physical PC to an external hard drive or your Mac over the network, choosing exactly what makes it into that virtual machine.

For VirtualBox – A Manual Method

VirtualBox doesn’t offer an easy graphical utility for converting a physical machine to a virtual machine. If you’re feeling particularly adventerous, they do offer some unsupported instructions for converting a physical Windows computer to a VirtualBox virtual machine. This requires some registry tweaking and shutting down the computer. You’ll then have to manually create a copy of the disk and convert it to a VirtualBox VDI file. The process for converting a Linux virtual machine should be about the same, but without all the extra tweaks required to make Windows behave. It’s much easier to move Linux installations between different machines with different hardware configurations.

This process isn’t for the faint of heart, and we include it here only for the sake of completeness. Even if you use VirtualBox already, you may want to just use VMware or Microsoft’s utility and give VMware or Hyper-V a try. If you’re still ready to give it a try, consult the MIgrate Windows page on VirtualBox’s wiki.


If you’re converting a Windows PC to a virtual machine, remember that you may encounter licensing issues. Windows Activation may detect that it’s running on a different machine, and you may have to contact Microsoft to get it properly activated. Windows licenses are only supposed to be in use on one computer at a time.


  • -

Remote Support

Remote Support Software:


  • TeamViewer –  is the All-In-One Software for Remote Support and Online Meetings: To Download: Click HERE


  • LogMeIn123 –  is a provider of SaaS and cloud-based remote connectivity services for collaboration, IT management: To Download: Click HERE

  • -

Site Map

Here is our Site-Map


[pagelist]